

Since my wedding I’ve been kind of obsessed with fabric banners. But my sewing machine is on the fritz so I turned to my first love—paper. I wanted something that said “Happy Halloween” but wasn’t tied to a design beyond that. A few Google Image searches later, I found the above design and fell in love.*
Downloading and printing to some cardstock was easy but stringing it up was trickier so I wanted to share some tools and tips:

To string the banner I needed to create holes for the ribbon to pass through. There is actually a ribbon craft punch for this but I don’t have it so I grabbed my exacto knife and some quilting supplies: a Fiskars self-healing cutting mat (LOVE this thing!) and clear acrylic ruler. As long as you’re very careful about blade pressure, you should be OK cutting on the self-healing mat but I should warn that it’s not meant for this and you could damage yours if you’re not careful. So proceed gently.
 I measured over roughly .24″ and cut a series of straight lines to form an elongated rectangle. I didn’t obsess over getting it perfectly measured, but I did use a ruler to guide me for the free-hand cutting. Test your ribbon width and length on the first few to make sure you’re allowing enough room for it to easily pass through.
 Once the ribbon was strung, I laid out the entire banner on the floor to fix spacing. I decided not to glue the individual pennant pieces to the ribbon so I can change for spacing in the future if hanging on a mantel, larger doorway, or wall. But I wanted to make sure the same amount of ribbon was on each side of the end pieces, so I measured out about 12″ extra on each side for some wiggle room.


Since I’d measured the “extra” ribbon end pieces so carefully once I’d spaced out from the middle, I decided to subtly mark the spot where both the end pieces were aligned (as well as the centered, middle pennant piece) for future reference. I just used a Sharpie to blacken out some of the ribbon’s detailing—easy.
The final product:
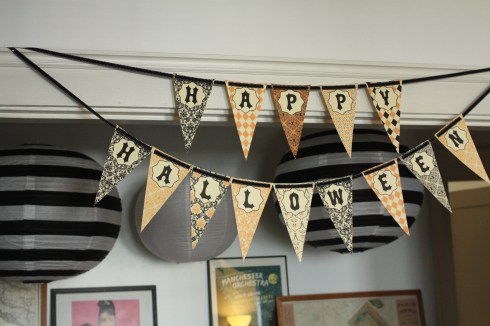
I’m really pleased with how it turned out. It would have been so much easier to just glue it to some ribbon but I wanted to make it so it lasts for at least a few Halloweens. So I splurged on the cardstock printing and took the time to string the ribbon and I’m so glad I did! It hangs so nicely and has received tons of compliments.
* Cannot for the life of me track down the file now! So sorry for those who have asked for it. The search continues. In the meantime, here is a link to another Halloween banner we printed this year too, (below). It didn’t get the same treatment as the other banner, but it’s still cute I think. Happy-almost-Halloween!


Love it such a cute idea 🙂